本篇是基于安装了
2.1.1版本 Development Kit 的用户,如果您安装的是1.11.5版本的 Development Kit ,请点击 »>传送门«<。您可以在 “开始菜单 - SR Research - SR Version” 中查看eyelink_core.dll的版本来确定您的 Development Kit 版本。
1. 脚本讲解
在阅读本篇教程之前,请在内心温习下眼动实验的嵌套结构和 5 个 E-Prime 脚本的位置。
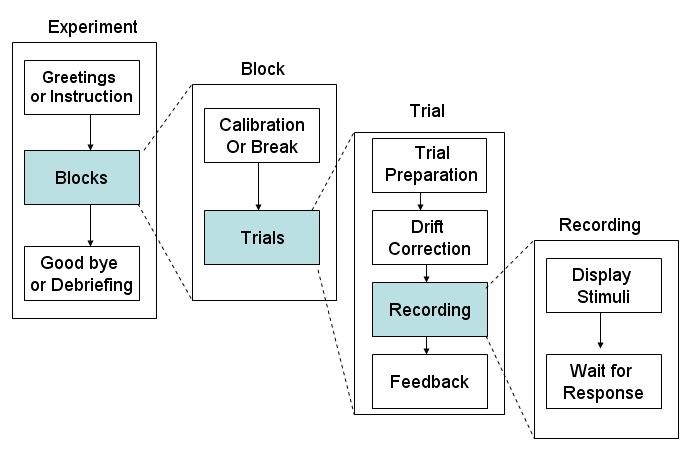
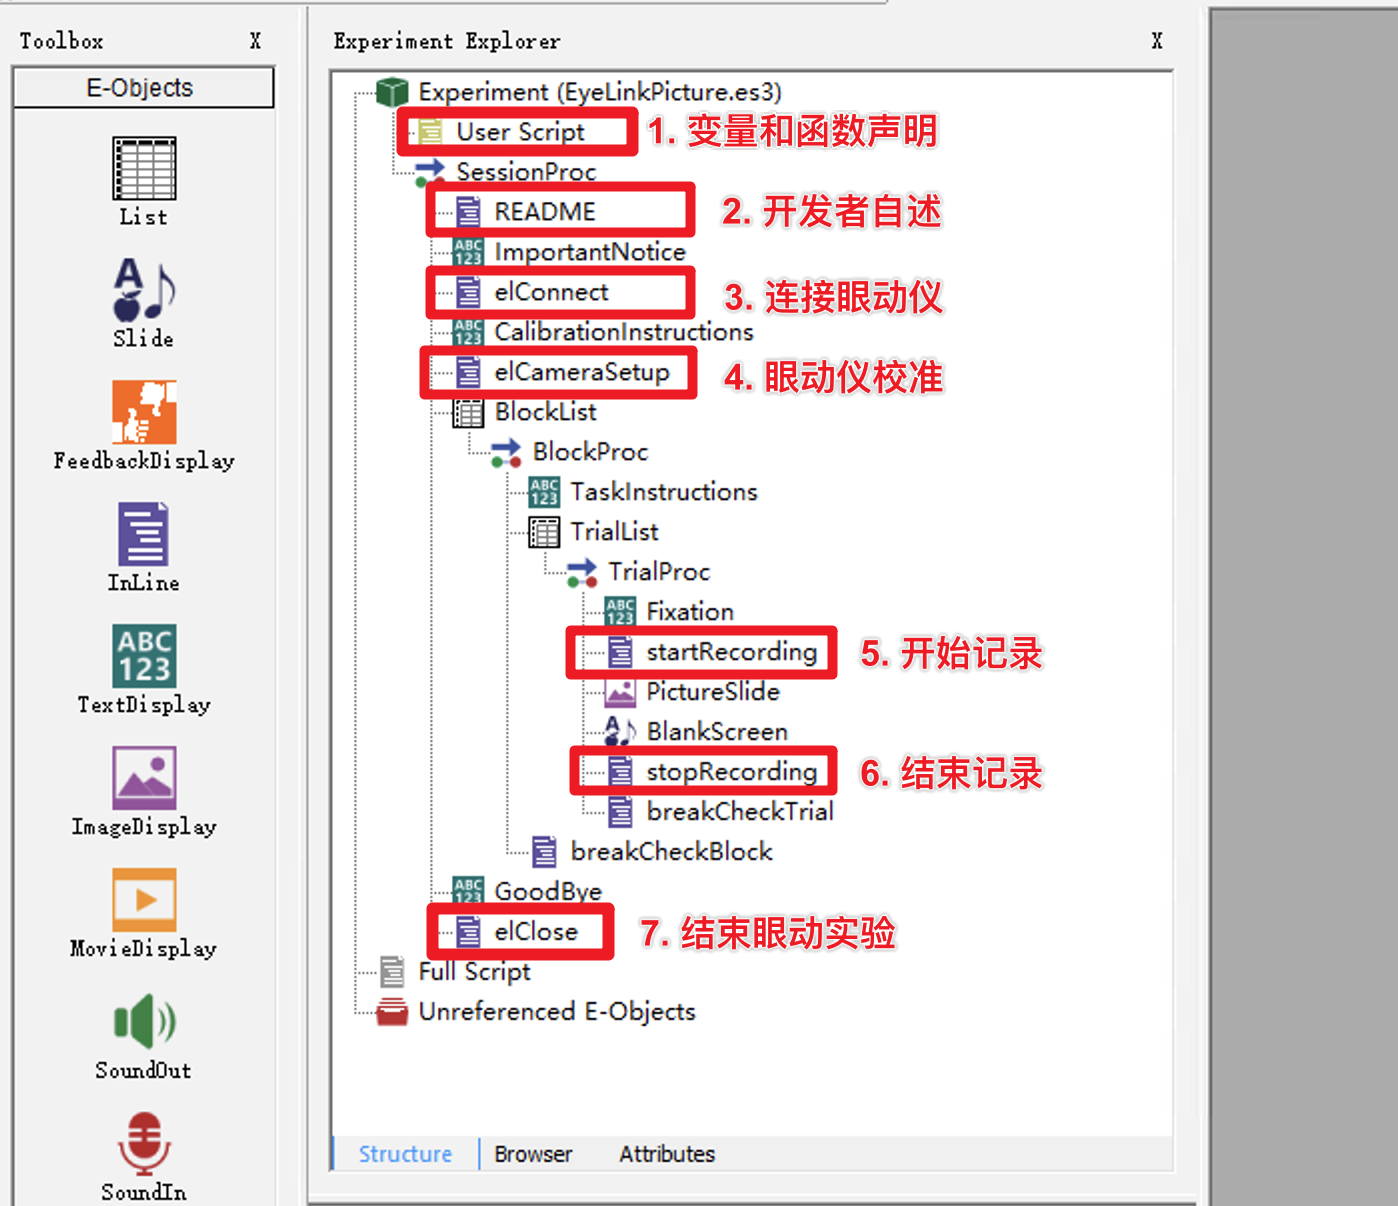
E-Prime 中的 TrialProc 即对应 Trial 层,而 TrialProc 中 elStartRecording 和 elStopRecording 两个脚本中间的部分即对应了 Recording 层。
换句话说,每个试次中有且仅有一对 elStartRecording 和 elStopRecording 脚本!
通常来讲,elStartRecording 脚本应位于 TrialProc 的最开始。但如果需要使用 DriftCorrect(漂移矫正),则需要在其前面放置一个 Fixation 屏用于显示校准点,如示例程序中那样。
elStopRecording 脚本则大多位于 TrialProc 的末尾,当然您也可以在其后面增加一个 breakCheckTrial 脚本用于在试次末尾中断实验。
下面我们来分段讲解 elStartRecording 脚本。
1.1 标记试次开始
复制粘贴即可。
'----- 为 Data Viewer 标记试次的开始 --------------------------------------------

' 在开始记录眼动数据之前,发送一个 "TRIALID" 开头的 message。
' 默认情况下,Data Viewer 以此条 message 作为每个试次的开始
' 更多信息请参阅: Protocol for EyeLink Data to Viewer Integration > Defining the Start and End of a Trial

' 通常会在 "TRIALID" 后连接一个数字以标记运行到了第多少个试次
' trialCounter 已在 User Script 中预先定义
trialCounter = trialCounter + 1
tracker.sendMessage "TRIALID " & trialCounter
1.2 设置主试机监测显示
接触过眼动实验的同学可能会了解,在眼动实验的进行过程中,实验主试是可以在主试机上看到被试机上呈现的刺激内容的。
在 Experiment Builder 中,此功能是通过 Prepare Sequence Action 控件实现的。而在 E-Prime 中,则需要代码把将要呈现的图片发送到主试机上显示。
然而在 E-Prime 中,很多时候我们只有将就呈现在屏幕上的几张图片素材,并没有完整呈现效果。我们只能退而求其次,将每个素材将会在屏幕上出现的位置标记出来,以代替完整的图片显示。
'----- 设置主试机显示 ------------------------------------------------------------

' 向数据中记录默认背景色,用以在 Data Viewer 中显示
' 颜色应与实验程序保持一致
tracker.sendMessage "!V CLEAR 192 192 192"

' 在实验过程中主试机 Record 屏的右下角添加文本提示
' 如呈现了哪张图片,抑或是已经完成了多少个试次
tracker.sendCommand "record_status_message 'Picture " & _
 c.GetAttrib("imageName") & " Trial " & trialCounter & "' "

'---- 设置主试机监测图像 ---------------------------------------------------------

' 在开始记录之前,我们需要在主试机屏幕上绘制参考画面
' 此过程需要主试机在 offline 状态下执行
tracker.setOfflineMode

' 使用 "clear_screen" 命令清空主试机的显示为全黑(颜色0)
tracker.sendCommand "clear_screen 0"

' 可选操作:
' 发送一张图片在主试机上显示,支持的格式包括 24 位的 bmp、jpg 和 gif
' 注意!此图片传输函数不会执行图片缩放操作,因此请先将图片缩放至合适的分辨率后再执行此函数
' 函数使用方法:
' tracker.BitmapToBackdrop <image file>, <transfer options>, <xs, ys>, <width, height>, <xd, xy>

' 函数注解:
' transfer options - 默认设置为 4 以保证最优的图片传输效果
' xs, xy: 源图像需要传输范围的左上角,默认为
' width, height: 源图像需要传输范围的宽高
' xd, yd: 要将传输图像放置在主试机上显示的位置(左上角)

' 对于需要传输完整图片的情况,可以讲 xs, xy, width 和 height 均设置为默认值 0 以传输完整图像
' 下面的例子是通过 0 的缺省设置传输完整图像的例子
' 并通过图像的的尺寸和在 E-Prime 中显示的位置确定其在眼动主试机中的显示位置
tracker.BitmapToBackdrop c.GetAttrib("imageName"), 4, 0,0, 0,0, _
 (c.GetAttrib("imXLoc")-(c.GetAttrib("imWidth")/2)), _
 (c.GetAttrib("imYLoc")-(c.GetAttrib("imHeight")/2))

' 可选操作:
' 通过绘制图片边框或边界线代替背景图片显示,适用于无法提前获得完整屏幕显示的情况
' 更多信息请参阅: EyeLink Programmers Guide - section 25.7 - "Drawing Commands"

' 下面的例子是在屏幕中心绘制一个长宽各 100 像素的中性灰(color 7)空心矩形
' tracker.sendCommand "draw_box " & Display.XRes/2 -50 & " " & Display.YRes/2 - _
' 50 & " " & Display.XRes/2 + 50 & " " & Display.YRes/2 + 50 & " 7"

' 下面的例子是在主试机屏幕上绘制刺激图片边界代替完整图片呈现
tracker.sendCommand "draw_box " & c.GetAttrib("imXLoc")- _
 (c.GetAttrib("imWidth")/2) & " " & c.GetAttrib("imYLoc")- _
 (c.GetAttrib("imHeight")/2) & " " & c.GetAttrib("imXLoc")+ _
 (c.GetAttrib("imWidth")/2) & " " & c.GetAttrib("imYLoc")+ _
 (c.GetAttrib("imHeight")/2) & " 7"
1.3 漂移矫正
在本篇最开始的时候有提到 elStartRecording 脚本应当放在 TrialProc 的最开始。但当需要使用 Drift Correct 功能时,则需要在其前面前置一个 Fixation 屏。那么现在就是了。
什么是 Drift Correct ? 您可以阅读这篇文章 »>Drift Correction Action«<。
如果需要使用此向功能,则保留此部分代码和前置的 Fixation 屏。否则请删除此部分代码以及前置的 Fixation 屏。
'----- 漂移矫正 ----------------------------------------------------------------

' 下面的代码用于执行自定义的 Drift Correct

' 函数定义如下:
' doDriftCheck(xloc, yloc, draw, allow_setup, [customDrift])

' xloc As Integer - 校准点的实际显示位置的 X 坐标
' yloc As Integer - 校准点的实际显示位置的 Y 坐标

' draw As Boolean - 是否使用默认的校准点
' True = 使用默认的圆点作为校准点
' False = 使用自定义的校准点
' 如设置使用自定义的校准点,需要额外设置校准屏的名称作为最后一个输入参数

' allow_setup As Boolean - 是否允许按 "ESC" 中断 Drift Correct 进入 相机校准
' True = 允许按 "ESC" 中断 Drift Correct 进入 相机校准
' False = 无法通过按 "ESC" 中断 Drift Correct 进入 相机校准
' 请将此选项设置为 True 以便在需要的时候随时校准眼动仪

' customDrift As Variant - 自定义校准屏的名称,仅在 draw 设置为 False 时可用

' 下面是一个调用 startRecording 脚本前的 Fixation 屏作为自定义漂移矫正屏的例子
doDriftCheck Display.XRes/2, Display.YRes/2, False, True, Fixation

' 您也可以使用下面的代码,使用默认校准点执行漂移矫正
'doDriftCheck Display.XRes/2, Display.YRes/2, True, True
1.4 开始记录
复制粘贴,无需更改
'----- 开始记录 -----------------------------------------------------------

' 在正式开始记录眼动数据之前,执行此函数确保眼动仪处在 ideal Mode
tracker.setOfflineMode

' 开始记录数据:
' tracker.startRecording file_samples file_events link_samples link_events

' file_samples As Boolean - 是否在 edf 数据中保存 sample 数据
' file_events  As Boolean - 是否在 edf 数据中保存 event 数据
' link_samples As Boolean - 是否允许在线传输 sample 数据给 E-Prime 程序
' link_events  As Boolean - 是否允许在线传输 event  数据给 E-Prime 程序

tracker.startRecording True, True, True, True

sleep 100 ' 延迟 100 ms 以确保眼动仪在刺激呈现之前开始记录眼动数据
2. 源代码
'-------------------------------------------------------------------------------

'-----DEFINE START OF TRIAL (for Data Viewer)-----------------------------------

'Send a TRIALID message before starting to record.
'EyeLink Data Viewer defines the start of a trial by the TRIALID message.  One
'(and only one) TRIALID message should occur before the beginning of each trial.
'See DataViewer manual section: Protocol for EyeLink Data to Viewer Integration
'> Defining the Start and End of a Trial

'The below TRIALID message is also using the trialCounter variable value as the
'ID in order to clearly mark the trial number in the .edf.
trialCounter = trialCounter + 1
tracker.sendMessage "TRIALID " & trialCounter

'-----SET HOST PC DISPLAY ITEMS-------------------------------------------------

'Set screen clear message for Data Viewer. 192, 192, 192 is the RGB for our
'slide background colours (see slide properties).
tracker.sendMessage "!V CLEAR 192 192 192"

'Supply text at the bottom of the Eye Link Host computer screen, intended as
'feedback for the experimenter (e.g., to help monitor how many trials remain)
tracker.sendCommand "record_status_message 'Picture " & _
 c.GetAttrib("imageName") & " Trial " & trialCounter & "' "

'----SET HOST PC IMAGE----------------------------------------------------------

'Before recording, we place reference graphics on the EyeLink display
tracker.setOfflineMode  'Must be offline to draw to EyeLink screen

'The command "clear_screen" erases the tracker display to color 0 (black)
tracker.sendCommand "clear_screen 0"

'OPTIONAL: Send an image to the Eye Link Host computer screen: Image format can
'be 24bit bmp, jpg, or gif.
'NOTE: This image transfer function works for non-resized image presentation
' only.  If you need to resize images and use this function, please resize the
' original image files beforehand.
'USAGE: tracker.BitmapToBackdrop <image file>, <transfer options>, _
' <xs, ys>, <width, height>, <xd,xy>
'NOTES:
' Transfer options should be left at 4 (MAXCONTRAST) for best image transfer.
' xs, xy: top-left corner of region to be transferred within source image.
' width, height: size of region to be transferred within source image.
' xd, yd: location (top-left) where image region to be transferred will be
'  presented on the Host PC.
'Use zero values for full image size, and upper left position placement.
'Transfer options should be left at 4 for best image transfer.
'The following is leaving the image display size at its default (0,0, 0,0,),
' then positioning the image based on the image size and screen location as set
' via the TrialList variables and PictureSlide setup.
tracker.BitmapToBackdrop c.GetAttrib("imageName"), 4, 0,0, 0,0, _
 (c.GetAttrib("imXLoc")-(c.GetAttrib("imWidth")/2)), _
 (c.GetAttrib("imYLoc")-(c.GetAttrib("imHeight")/2))

'OPTIONAL: draw feedback box and lines on the Host PC display instead of, or on
'top of, the backdrop image.  See section 25.7, "Drawing Commands", in the
'EyeLink Programmers Guide manual for further information.
'EX: The command "draw_box" draws a box in color 7 (medium gray).
'tracker.sendCommand "draw_box " & Display.XRes/2 -50 & " " & Display.YRes/2 - _
'50 & " " & Display.XRes/2 + 50 & " " & Display.YRes/2 + 50 & " 7"

'The following draw_box command draws a box around the location of the trial's
'presented image.
tracker.sendCommand "draw_box " & c.GetAttrib("imXLoc")- _
 (c.GetAttrib("imWidth")/2) & " " & c.GetAttrib("imYLoc")- _
 (c.GetAttrib("imHeight")/2) & " " & c.GetAttrib("imXLoc")+ _
 (c.GetAttrib("imWidth")/2) & " " & c.GetAttrib("imYLoc")+ _
 (c.GetAttrib("imHeight")/2) & " 7"

'-----DRIFT CHECK---------------------------------------------------------------

'The following line calls a drift check with a custom target.  Please note
'that for:

'doDriftCheck(xloc As Integer, yloc As Integer, draw As Boolean, allow_setup _
'As Boolean,Optional customDrift As Variant [required if draw is True])

''xloc' and 'yloc' are the x,y coordinates of the center of the location used
'for the drift check (i.e., where the center of the stimulus would be drawn).

'The 'draw' parameter tells the command whether to draw the default drift check
'dot (True) or not (False).  If you are using an E-Prime object to draw the
'drift check target, set draw as False and make sure you specify the E-Prime
'object name for the customDrift parameter.  If you would like to use the
'default target, please set draw as True (true = use the default target).

'The 'allow_setup' parameter tells the command whether to allow the use of an
'ESC key press to switch from drift check mode into full camera setup mode
'(True) or not (False).  The ability to switch to camera setup mode from a drift
'check allows you to recalibrate if necessary.

'The 'customDrift' parameter is only required if 'draw' is set to False.  It
'should specify the name of the E-Prime object that handles the presentation of
'the target.

'In the below line, we call the drift check, provide the x location and y
'location of the target center, list False for draw as we are using a custom
'E-Prime object as the target, True for allow_setup so we can drop into the
'calibration screen if desired, and Fixation as the name of the E-Prime object
'that handles the target drawing -- the exact name of the E-Prime object should
'be specified.  In this case, Fixation is the name of the object that handles
'the target drawing (it is directly before the startRecording inline).
doDriftCheck Display.XRes/2,Display.YRes/2,False,True,Fixation

'or to use the default drift check circle, while still allowing entry into the
'calibration section (allowable if allow_setup is true):
'doDriftCheck Display.XRes/2,Display.YRes/2,True,True

'-----START RECORDING-----------------------------------------------------------

'Ensure the tracker returns to idle mode before actually calling the
'startRecording function
tracker.setOfflineMode 'This second tracker.setOfflineMode call is needed to
	'ensure proper tracker mode transition and recording.

'Four arguments to the startRecording() function set what data will be recorded
'to the EDF file and sent via the link.  If an argument is 0, recording of the
'corresponding data is disabled.  In order, arguments are:

'file_samples -- If true, writes samples to EDF file. If false, disables sample
	'recording.
'file_events  -- If True, writes events To EDF file. If False, disables event
	'recording.
'link_samples -- If True, sends samples through link. If False, disables link
	'sample access.
'link_events  -- If True, sends events through link. If False, disables link
	'event access.

tracker.startRecording True, True, True, True

sleep 100 'Delay to make sure that the Host PC is properly up and running before
		  'the trial stimuli are presented
以上。