本篇是基于安装了
1.11.5版本 Development Kit 的用户,如果您安装的是2.1.1版本的 Development Kit ,请点击 »>传送门«<。您可以在 “开始菜单 - SR Research - SR Version” 中查看eyelink_core.dll的版本来确定您的 Development Kit 版本。
elStartRecording 和 elStopRecording 是最关键的两个脚本。本文中会涉及一些眼动实验编程的基础概念。
elStartRecording 脚本是难度最高的一个脚本,需要了解一些 E-Basic 的语法才能读懂。
1. 讲解
1.1 执行 DriftCorrect
第一部分的代码是在执行 DriftCorrect 。
关于 DriftCorrect 的功能和作用您可以查看»>DriftCorrection可以帮我们做到哪些事情«<。
'使用用户自定义的 Drift 界面进行 DriftCorrect
'函数使用方法如下
'doDriftCorrect(x坐标(Integer), y坐标(Integer), 是否使用自定义的Drift界面(Boolean), Drift过程中是否允许相机校准(Boolean), 指定的自定义的Drift界面的名称(Variant))
'如果使用自定义的Drift界面,那么您需要将第三个输入参数(第一个Boolean参数)设置为 False ,意为不使用默认的Drift界面。并在语句的结尾附上指定的 Drift 界面。如下所示:
doDriftCorrect Display.XRes/2,Display.YRes/2,False,True,Fixation

'如果不使用自定义的Drift界面,那么您需要将第三个输入参数(第一个Boolean参数)设置为 True ,意为使用默认的Drift界面。如下所示
'doDriftCorrect Display.XRes/2,Display.YRes/2,True,True

'上面两行代码根据需要自行取用。
值得注意的是
doDriftCorrect Display.XRes/2,Display.YRes/2,False,True,Fixation
中所使用的 Fixation 是指 elStartRecording 脚本前面紧挨着的 Fixation 屏,如下图所示:
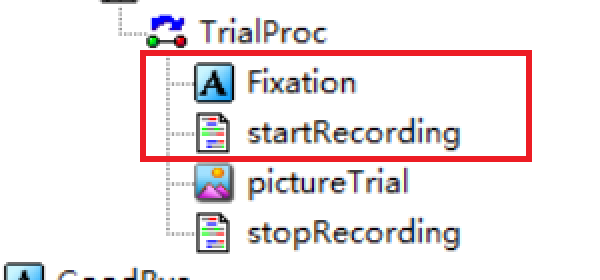
在使用自定义的 DriftCorrection 屏的时候,一定要将 elStartRecording 放在自定义的 DriftCorretcion 屏之后。
1.2 标示试次的开始
'在开始记录眼动数据之前一定要先发送一个“TRIALID”的 Message
'EyeLink Data Viewer 将会以 TRIALID 的 Message 定义一个试次的开始
'这条 Message 与开始记录的命令不同,不是控制眼动仪的行为,而是向数据文件中添加标记
'Data Viewer 不会处理这条 Message 前的任何数据
tracker.sendMessage "TRIALID " & TrialList.GetCurrentAttrib("trialid")
此处我们看到的是 tracker.sendMessage 这个函数的基本用法。在函数后面直接设置需要发送的 Message 文本内容。
“ & ” 符号在 E-Basic 语言中有链接字符串的功能。
TrialList.GetCurrentAttrib("trialid") 则直接引用了 TrialList 中 trialid 的值。
假设 TrialList 中,当前行 trialid 的值为 12 ,则发送的 Message 内容为 “TRIALID 12”。
1.3 配置主试机的 Record 页面
1.3.1 Record Status Message
此项功能在大多数情况下是不需要的。
'在数据采集过程中,主试机Record屏的左下角进行一些文字性的提示
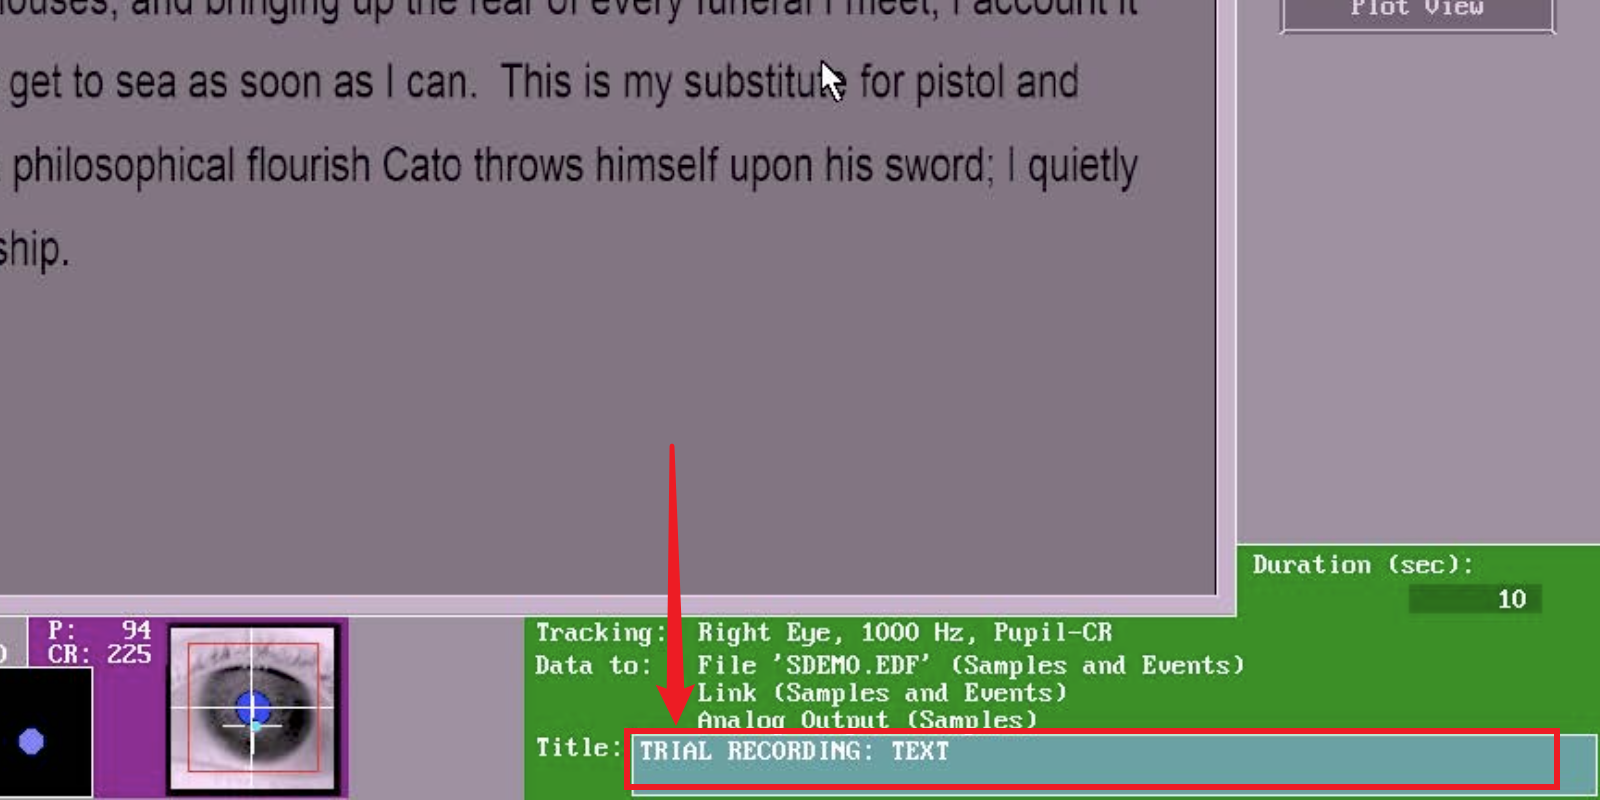
tracker.sendCommand "record_status_message 'Picture " & TrialList.GetCurrentAttrib("imageName") & " Trial " & TrialList.GetCurrentAttrib("trialid") & "' "
提示内容将显示在下图所示的位置(红框标记):
这部分其实可以删除。
1.3.2 设置主试机监控区域的显示屏幕
此段代码主要用于设置主试机Record屏中,用于监控被试机显示内容的部分。
主试机和被试机是两台机器,是需要分别设置的。
被试机已经通过E-Prime程序设置了刺激呈现序列,主试机显示的内容则需要我们通过代码来手动完成。
'在开始记录眼动数据之前,我们可以把主试机呈现的刺激内容传输到主试机上进行同步显示
tracker.sendCommand "set_idle_mode"  '在绘制 Eyelink 屏幕之前,首先要让主试机进入 Offline 屏
' "clear_screen" 命令将主试机的屏幕设置为0(黑色)
tracker.sendCommand "clear_screen 0"
' "draw_box" 命令在主试机上绘制一个颜色为 7 (中性灰)的矩形
' “Display.XRes/2 -50 & " " & Display.YRes/2 - 50 & " " & Display.XRes/2 + 50 & " " & Display.YRes/2”为左上右下边界
tracker.sendCommand "draw_box " & Display.XRes/2 -50 & " " & Display.YRes/2 - 50 & " " & Display.XRes/2 + 50 & " " & Display.YRes/2 + 50 & " 7"
上述的 draw_box 代码是为了在屏幕上做一个标记。
在有些情况下,我们希望监控一个试次内连续出现的多屏刺激(如学习再认范式)。每屏刺激中所呈现的刺激物的位置和大小会有所不同。受到某些限制,我们不能让主试机显示的内容随着被试机同步迭代,我们只能选择多屏中的一屏进行监控。
为了能监控所有屏中被试有没有看刺激物,我们退而求其次地一次向在屏幕上把所有屏的刺激物的范围全部画出来,以此进行刺激物监控。
不需要 draw_box 的功能则可以直接删除这段代码。
'下面的代码是为了告诉 Data Viewer 刺激的背景是什么
'详情请查阅 EyeLink Data Viewer User Manual 中 "Protocol for EyeLink Data to Viewer Integration" 的部分
'IMGLOAD 命令用于在 DV 中呈现背景图片
tracker.sendMessage "!V IMGLOAD FILL " & TrialList.GetCurrentAttrib("imageName")

'将图片发送到主试机的监控背景上,图片格式支持 24bit 的 bmp、jpg 或 gif
tracker.BitmapToBackdrop TrialList.GetCurrentAttrib("imageName"), 4
此处直接使用 .GetCurrentAttrib 函数引用 TrialList 中的变量值即可。
此部分需要修改 .GetCurrentAttrib 函数引用的内容,要与自己 List 中的条目对应上。如果没有做成一张完整的图片,则可以在刺激呈现后再截屏,仅发送 DV 相关的命令即可。
1.3.3 开始记录 StartRecording
'在开始记录眼动之前,先让眼动仪进入 idle mode 一段时间,确保 startRecording 函数可以正常工作
'startRecording() 函数后的四个变量分别表示:“是否将Sample数据存入.edf文件”、“是否将Event数据存入.edf文件”、“是否将Sample数据在线传输给被试机”和“是否将Event数据在线传输给被试机”
'如果某一个参数为 0 或 False ,则对应的数据操作则不会被执行
tracker.sendCommand "set_idle_mode"
Sleep 50 ' 休眠 50ms 以确保眼动仪准备好
tracker.startRecording True, True, False, False

'预记录 100ms 的数据
elutil.pumpDelay 100

'下面的代码用于记录后续刺激呈现命令发出的时间
'发送内容为 "pictureTrial_Start" 的 message 来进行标记
Dim timeStart As Long   ‘定义一个名字为 timeStart 的 Long(长整型) 变量
timeStart = elutil.currentTime()    '获取当前被试机时间戳
tracker.sendMessage  "pictureTrial_Start"   ‘发送Message
代码最后定义的 timeStart 将在 elStopRecording 脚本中用于计算刺激呈现延迟,我们放到后面讲解。
前半部分复制粘贴即可,后面发送 Message 的部分修改一下 Message 的内容。
2. 源代码
'perform drift correct with custom target
'please notice that for
'doDriftCorrect(xloc As Integer, yloc As Integer, draw As Boolean, allow_setup As Boolean,Optional customDrift As Variant)
'if  customDrift is provided, please set draw as False (without default drift target (a circle) drawn to the screen)
'if  no customDrift is provided, please set draw as True (means: using the default target)
doDriftCorrect Display.XRes/2,Display.YRes/2,False,True,Fixation

'or using:
'doDriftCorrect Display.XRes/2,Display.YRes/2,True,True

'Always send a TRIALID message before starting to record.
'EyeLink Data Viewer defines the start of a trial by the TRIALID message.
'This message is different than the start of recording message START that is logged when the trial recording begins.
'The Data viewer will not parse any messages, events, or samples, that exist in the data file prior to this message.
tracker.sendMessage "TRIALID " & TrialList.GetCurrentAttrib("trialid")

'This supplies the title at the bottom of the eyetracker display
tracker.sendCommand "record_status_message 'Picture " & TrialList.GetCurrentAttrib("imageName") & " Trial " & TrialList.GetCurrentAttrib("trialid") & "' "
'Before recording, we place reference graphics on the EyeLink display
tracker.sendCommand "set_idle_mode"  'Must be offline to draw to EyeLink screen
'The command "clear_screen" erases the tracker display to color 0 (black)
tracker.sendCommand "clear_screen 0"
 'The command "draw_box" draws a box in color 7 (medium gray).
tracker.sendCommand "draw_box " & Display.XRes/2 -50 & " " & Display.YRes/2 - 50 & " " & Display.XRes/2 + 50 & " " & Display.YRes/2 + 50 & " 7"

'The following code is for the EyeLink Data Viewer integration purpose.
'See section "Protocol for EyeLink Data to Viewer Integration" of the EyeLink Data Viewer User Manual
'The IMGLOAD command is used to show an overlay image in Data Viewer
tracker.sendMessage "!V IMGLOAD FILL " & TrialList.GetCurrentAttrib("imageName")

'Send image to EyeLink screen: Image format can be 24bit bmp, jpg, or gif.
tracker.BitmapToBackdrop TrialList.GetCurrentAttrib("imageName"), 4

'Puts the tracker into the idle mode for a brief period before actually calling the startRecording function
'Four arguments to startRecording() function set what data will be recorded to the EDF file and sent via the link.
'If an argument is 0, recording of the corresponding data is disabled
tracker.sendCommand "set_idle_mode"
Sleep 50 ' delay so tracker is ready
tracker.startRecording True, True, False, False

'Allowing 100 milliseconds of data to accumulate before the trial display starts
elutil.pumpDelay 100

'The following is used to read the current time when the pictureTrial screen is processed
'Write out a "pictureTrial_Start" message to mark this.
Dim timeStart As Long
timeStart = elutil.currentTime()
tracker.sendMessage  "pictureTrial_Start"
以上。